Install the fix from microsoft:

http://support.microsoft.com/kb/310049#FixItForMe
Reff: http://www.msoutlook.info/question/444
If you noticed your accidental moving a little bit later, then the above method will not help you anymore. To prevent you from needing to click through every folder, you can also get a list of folders via the Folder Size option;
Outlook will now list all your folders in an easy to scroll window so you can quickly review the names of the folders that you have. It will also reveal the full folder path so that you can easily browse to it once you’ve found it.

Using the Folder Size dialog to find back a folder by name.
Note 1: If you already have an idea under which folder the moved folder could be, you can also use the Folder Size button of that folder to narrow down your search.
Type your public IP address here.
Reff: http://gmailblog.blogspot.com/2009/07/send-mail-from-another-address-without.html
Quite a few of you use Gmail’s custom “From:” to send messages with one of your other email addresses listed in place of your Gmail address. Since these messages are sent by Gmail’s servers but “from” a non-Gmail address, we have to include your original Gmail username in the “Sender” field of the message header to comply with mail delivery protocols and help prevent your mail from being marked as spam. Most email programs just display the “From” address and not the “Sender” field, but some (including versions of Microsoft Outlook) show these messages as coming “From username@gmail.com On Behalf Of customaddress@mydomain.com” which really annoyed people.
We heard your request for another option that wouldn’t show the “on behalf of” text loud and clear, and now there’s a new option that does just that. Instead of using Gmail’s servers to send the message, we’ll use the servers where your other email address lives. Since Gmail isn’t the originating domain, we don’t have to include “Sender” info in the header. No more “on behalf of.”
Here’s the difference. All custom “From:” addresses used to work like this:

Now, if your other email provider supports POP and/or IMAP access, you can choose to send your message like this instead:

To switch to this new method, go to the Accounts page under Settings, and click “edit info” from the “Send mail as” section. Then choose the option to “Use your other email provider’s SMTP servers.”
We recognize that your other address might not have a server that you can use to send outbound messages — for example, if you use a forwarding alias rather than an actual mailbox, or if your other email provider doesn’t support authenticated SMTP, or restricts access to specific IP ranges. For this reason, we’ve kept the original method as well. Check out our Help Center for further details on these two “send mail as” configuration options.
If you use Google Apps Premier or Education edition and would like to send mail as another address within your domain or within an aliased domain, no sweat. We do all the work behind the scenes so your original username won’t be listed in the “Sender” header, and your recipients won’t see “on behalf of.”
This is very useful when you want to test your outgoing email for SharePoint but not have access to an SMTP server.


You can specify only the servers that you want to be able to send email here by selecting Only the list below and adding your servers IP addresses.


Select Basic Authentication and specify your Gmail account and password. Check the TLS encryption.

Set TCP port to 587.

specify the smart host as smtp.gmail.com
Reff:
How to Configure IIS SMTP Server to forward emails using a Gmail account
Reff: http://www.itsolutionskb.com/2008/11/installing-and-configuring-windows-server-2008-smtp-server/
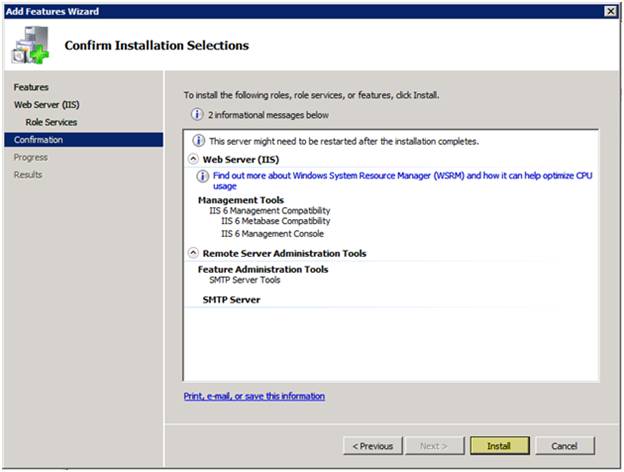
Installing SMTP Server Feature on Windows 2008 is an easy process requiring only few steps to complete. On this article we will describe a step by step configuration and installation of the SMTP Server feature and how to enable the smtp to relay from local server.
Step 1:
Opening Server Manager Console and under Features select Add Features

Step 2:
Selecting SMTP Server option

Step 3:
Click on Install wait until finish and click close

Step 4:
Waiting for installation to finish and clicking on Close

Step 5:
Opening IIS 6.0 Manager under Administrative Tools -> Internet Information Services 6.0

Step 6:
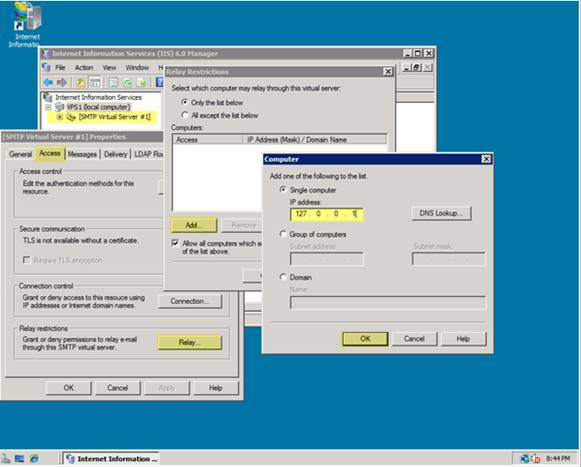
Under [SMTP Virtual Server] second mouse click and properties

Step 7:
Select Relay under Access Tab

Step 8:
Select Only the list below and click on Add button

Step 9:
Enter IP Address 127.0.0.1 for relay

Step 10:
Sending a manual email through telnet to confirm everything working successfully. Telnet localhost 25 or telnet yourpublicip 25 and make sure you open the specific port on your firewall to be available to public.

To send e-mail from a PHP application using the System.Net.Mail API, you must configure Simple Mail Transfer Protocol (SMTP) e-mail. Configuring e-mail services tells the System.Net.Mail application programming interface (API) to which SMTP server to deliver the e-mail generated by your application. Mail can be delivered immediately, or it can be delivered to a file location on disk where it can be retrieved for delivery later. For example, a company can provide an e-mail link for sending feedback messages or for requesting information.
The procedures for configuring SMTP e-mail can be performed at the following levels in Internet Information Services 7 (IIS 7) and above:
The SMTP server is not installed by default.
1. Open Server Manager by right-clicking on My Computer, and selecting Manage. (Alternately, open Control Panel, click on Programs and Features, and then select Turn Windows features on or off.)
2. Under Features, select Add Features.
3. Select the SMTP Server check box.
4. Click Add Required Role Services. If there are any missing roles required for the SMTP installation, Windows Server® 2008 R2 or Windows Server® 2008 installs them. Click Next.
5. You need to step through the entire wizard again, even though IIS is already installed (IIS 6 Management Compatibility and the IIS 6 Management Console must be installed for SMTP to work).
6. Press Close when installation is complete.
Once you add SMTP, you can configure it for your PHP applications. This can be done by using the user interface (UI), by running Appcmd.exe commands from a command prompt, by editing configuration files directly, or by writing Windows® Management Instrumentation (WMI) scripts. Note that you must have IIS installed before enabling SMTP.
1. Open Internet Information Services (IIS) Manager, and then navigate to the level you want to manage.
2. In Features View, double-click SMTP E-mail.
3. On the SMTP E-mail page, type the e-mail address of the sender in the E-mail address text box.
4. On the SMTP E-mail page, select one of the following delivery methods:
a. Deliver e-mail to SMTP server: to deliver e-mail messages immediately. This requires an operational SMTP server for which the user has credentials.
b. Store e-mail in pickup directory: to store e-mails in a file location on disk for later delivery by the PHP application (or by a Microsoft® ASP.NET application or by a user).
5. If Deliver e-mail to SMTP server is selected, do the following:
a. Type the unique name of your SMTP server in the SMTP Server text box, or select the Use localhost check box to set the name to LocalHost. Setting the name to LocalHost means that ASP.NET uses an SMTP server on the local computer. Typically, this is the default SMTP virtual server.
b. Enter a TCP port in the Port text box. Port 25 is the SMTP standard TCP port and is the default setting. More than one virtual server can use the same TCP port if all servers are configured by using different IP addresses.
c. Under Authentication Settings, specify the authentication mode and credentials if your SMTP server requires these.
6. If Store e-mail in pickup directory is selected, type the batch e-mail location in the Store e-mail in pickup directory text box.
7. Click Apply in the Actions pane.
You can configure IIS so that e-mail is delivered immediately or stored for later delivery.
Deliver e-mail messages immediately
To configure SMTP e-mail to deliver e-mail messages immediately, use the following syntax:
C:\%windir%\system32\inetsrv\appcmd set config /commit:WEBROOT /section:smtp /from: string /deliveryMethod:network /network.port: int /network.defaultCredentials:True|False /network.host:string /network.userName:string /network.password:string
The variable from string is the e-mail address of the sender. The variable /deliveryMethod:network configures IIS to deliver e-mail messages immediately. The variable /network.port int sets the TCP port that is used by IIS to deliver e-mail messages. The variable /network.host string specifies the host used for SMTP transactions. The variable network.defaultCredentials:True|False enables or disables authentication using the default network credentials. If defaultCredentials is set to True, Kerberos or NTLM are used if the server supports these protocols. The variables network.userName:string and network. password:string set a basic authentication user name and password.
Store e-mails for later delivery
To configure SMTP e-mail to store e-mails in a file location on disk for later delivery by an application, such as an ASP.NET application, or by a user, such as an administrator, use the following syntax:
C:\%windir%\system32\inetsrv\appcmd set config /commit:WEBROOT /section:smtp /from: string /deliveryMethod:PickupDirectoryFromIis|SpecifiedPickupDirectory /SpecifiedPickupDirectory:string
The variable from string is the e-mail address of the sender. The variable/deliveryMethod:PickupDirectoryFromIis|SpecifiedPickupDirectory string configures IIS to store e-mails in a file location on disk for later delivery. The variable /SpecifiedPickupDirectory string sets the file location on disk in which to store the e-mail messages for later delivery.
Note that when you use Appcmd.exe to configure the <mailSettings> element at the global level in IIS, you must specify /commit:WEBROOT in the command so that configuration changes are made to the root Web.config file instead of the ApplicationHost.config file.
1. First, configure the Php.ini file. Open the Php.ini file, and find the entry:
[mail function]
2. Set the following values:
SMTP=localhost
sendmail_from = string
smtp_port=25
Note that the default value is localhost, so there is no need to change this if SMTP is installed locally.
a. Save and close the Php.ini file.
3.Enable Relay for localhost:
a. Open the Internet Information Services (IIS) 6.0 Manager.
b. Right-click on Default SMTP Virtual Server.
4. On the Properties page, open the Access tab, and then click on Connection. You can see which server or IP addresses are allowed to connect to the server.
5. If the IP address 127.0.0.1 is not listed, add it using the Add button. You may also add your server IP address to the list.
6. Click OK to accept the information.
7. Click the Relay button on the Access tab, and set up the relay options for the server. Ensure that localhost and the IP address 127.0.0.1 are granted permission to relay mail.
8. Click OK to accept the options, and then click Apply and OK to return to the main page of the IIS Manager.
9. Click Restart IIS.
Create a test script to see whether you can send e-mail using PHP. Copy the following text and save it as email_test.php at your server root.
<?php
if(mail(‘user@mydomain.com’,’test message’)){
echo(‘ok’);
}
else{
Run the file at mydomain.com/email_test.php.
Moving mailboxes from Microsoft Exchange Server 2010 to Exchange Server 2007? Consider the following:
Reff:
http://technet.microsoft.com/en-us/library/dd638124%28v=exchg.141%29.aspx
Collected From:
http://exchangeserverpro.com/exchange-2010-install-management-tools
Question: How do I install the Exchange Server 2010 management tools on my workstation?
The Exchange Server 2010 management tools can be installed on a computer running one of the following operating systems:
To install the Exchange 2010 management tools on your Windows 7 computer you first need to configure the pre-requisite components.
Open the Control Panel, click on Programs and then click on Turn Windows Features On or Off. Enable the features shown here.

Enable Windows 7 features required for Exchange Server 2010 management tools
Download the Exchange Server 2010 SP1 installation files and extract them to a temporary folder on your computer. From that folder launch Setup.exe. If your computer is missing either the .NET Framework or Windows PowerShell pre-requisites there will be links for Step 1 and 2 to download and install them.

Install pre-requisites for Exchange Server 2010 SP1 on Windows 7
Otherwise click on Step 3 and choose Install only languages from the DVD.

Choose language options for installing Exchange Server 2010 SP1 on Windows 7
Next, click on Step 4 to begin the installation.

Begin installation of Exchange Server 2010 SP1 on Windows 7
Click Next at the introduction page, then accept the license agreement and click Next, then choose your preference for Error Reporting and click Next again.
At the Installation Type page choose Custom Exchange Server Installation, and also tick the box to Automatically install Windows Server roles and features required for Exchange Server and click Next.

Custom Exchange Server installation for installing management tools on Windows 7
Select the Management Tools role and click Next.

Installing the Management Tools role for Exchange 2010 on Windows 7
When the Readiness Checks have completed successfully click Install.

Begin installation of Exchange 2010 management tools on Windows 7
After the install has completed you can launch the Exchange Management Console from the Start -> All Programs -> Microsoft Exchange Server 2010 menu.
Exchange Web Service error in c#:
To solve this problem:
You need to switch the target framework in your project from “.NET Framework 4 Client Profile” to just:”.NET Framework 4″.
